Want to share feedback? Contact us.
Like many of you, I found myself wondering about the flexibility of LED lights, specifically if cutting them was a possibility. After scouring the internet for a clear-cut answer and coming up short, I dove into the world of LED lights myself.
Now, with ample hands-on experience, I’m here to share a comprehensive guide that will illuminate the ins and outs of customizing LED lights to fit your space perfectly.
Can You Cut LED Lights?
Yes, you can indeed cut LED strip lights to fit specific lengths. However, it’s crucial to do this with care to prevent any damage to the lights.
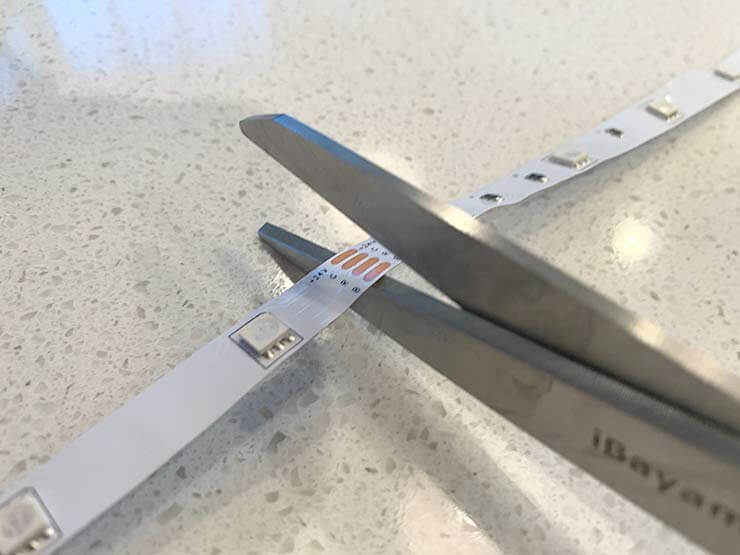
The key to successful cutting lies in identifying the designated cutting points. These are usually marked by a scissor icon or copper dots/pads on the strip. It’s essential to cut only at these points.
If you decide to cut at any other point, you might end up damaging the strip. This could cause the lights not to work, which is something we definitely want to avoid. So, remember, always cut at the designated points to keep your LED strip lights shining bright.
Why Would You Cut LED Lights?
Cutting LED lights is a practical approach when customizing the length to fit specific spaces, projects, or design requirements. I find this customization especially useful when installing lights around corners or in areas with unique dimensions. It allows for a clean, tailored look that enhances the overall aesthetic of the space.
Additionally, by cutting LED strips to the needed length, I avoid the problem of excess length that would otherwise need to be hidden or tucked away. This not only helps in maintaining a neat installation but also prevents wastage, ensuring that every inch of the LED strip is put to good use.
Moreover, cutting LED strips enables me to create angles, turns, or intricate lighting designs that require strips of varying lengths. For example, achieving a perfect 90-degree corner is much easier when you can cut and connect strips precisely. This flexibility is a significant advantage when working on more complex lighting projects.
Can Cut LED Light Still Work?
Yes, a cut LED light strip can still work if you cut it at the designated cutting points. These points are usually marked on the strip, making it easy to know where to cut without damaging the circuitry. By cutting at these specific points, you ensure that the electrical circuit remains intact, allowing the LEDs to function as intended.
However, if you cut the strip at any point other than the designated cutting areas, you risk some LEDs not working or the entire strip becoming unusable. This can also potentially damage the strip.
It’s important to note that the part of the strip that has been cut off will not work unless it is reconnected using a proper connector. So, always make sure to cut with care and at the right spot to keep your LED light strip shining bright.
What Tools Are Needed To Cut LED Lights?
Cutting LED lights requires specific tools to ensure a clean, precise cut without damaging the lights or their functionality. I recommend using sharp scissors or a utility knife. The sharpness is crucial as it helps avoid any damage to the LEDs or the circuitry, which could affect the performance of the lights.
Additionally, having a ruler or tape measure on hand is essential. This tool allows for accurate measurement of the LED strip, ensuring you cut the strip to the desired length without any guesswork.
For those planning to install their LED strip lights in aluminum channels, an optional but very useful tool is the LED strip channel roller. This tool can make the installation process smoother and is recommended for achieving a professional finish.
Step-by-Step Guide To Cutting LED Lights
- To cut LED lights properly, start by measuring the length required for your project. Place the LED strip in the desired location and use a tape measure to determine the exact length you need.
- Once you have your measurement, find the designated cutting points on the LED strip. These points are typically indicated by a scissor icon or copper dots, making them easy to identify.
- Next, take a sharp pair of scissors or a utility knife to make a clean, straight cut along the marked cutting point. It’s crucial to cut carefully to avoid damaging the LEDs or the circuitry, which could affect the functionality of the strip.
- Before you make any cuts, always ensure that the power is off. Cutting the LED strip while it’s powered can pose electrical hazards, so turning off the power is a critical safety step.
How To Connect LED Lights After Cutting Them?
Yes, you can connect LED lights after cutting them. To do this effectively, I recommend using a compatible connector, such as a quick connector or a 4-pin connector, which is specifically designed for LED strips. This is the first step to ensure a smooth reconnection process.
Next, it’s crucial to align the connector with the cut end of the LED strip carefully. Make sure the polarity matches and that the LED strip and the connector pins are correctly aligned. This step is essential for the lights to work properly after reconnection.
Once you have aligned everything correctly, secure the connection. This is often done by snapping or sliding the connector into place. Sometimes, you might need to adjust the connecting point between the connector and the light strip to ensure a secure and stable connection. This step is vital to prevent any loose connections that could affect the functionality of the LED lights.
In some cases, LED strips may require soldering or other methods of connection for a more permanent solution. This approach is usually taken when a more durable and long-lasting connection is needed. Soldering can provide a stronger bond between the cut pieces of the LED strip, but it requires some technical skills and equipment.
By following these steps, you can successfully reconnect cut LED lights, ensuring they work seamlessly as part of your lighting setup.
How To Use The Connector To Connect LED Lights?
Connecting LED lights with a connector is a straightforward process.
First, I open the connector to prepare it for the LED strip. Next, I carefully insert the cut end of the LED strip into the connector. It’s crucial to align the strip correctly, making sure the electrical contacts or pins on the connector match up with the copper dots on the LED strip. This ensures a proper connection.
Once the LED strip is in place, I close the connector. It’s important to secure it tightly to establish a firm electrical connection between the strip and the connector. A good connection is essential for the LED lights to work properly.
Finally, I test the connection by turning on the power. This step is vital to confirm that the LED lights are functioning as expected. If the lights do not turn on, I double-check the alignment and the firmness of the connector before trying again.
What Are The Pros And Cons Of Cutting LED Lights?
There are both pros and cons to cutting LED lights. Let’s dive into it!
Pros:
- On the positive side, I find that being able to customize the length of LED lights for specific installations is incredibly useful. It allows the lights to fit perfectly into specific spaces or designs, which is a significant advantage when you’re aiming for a polished look.
- Additionally, this customization means you can create unique lighting designs and patterns. There’s no need to tuck away or coil excess strip length, which can be unsightly or impractical.
- Another benefit is the reduction of wastage. By cutting the LED strip to the exact length needed, you use only what is necessary for your project.
Cons:
- There’s a risk of damaging the strip if it’s not cut correctly. Precision is key, and not everyone is comfortable or skilled with this level of detail.
- Furthermore, cutting the LED strip may void the warranty, which is an important consideration if you’re working with expensive lighting.
- Lastly, after cutting, you might need additional connectors to reconnect the strip. These connectors add to the overall cost and can be somewhat troublesome or tricky to operate, which might complicate the installation process.
What To Do If Your LED Light Doesn’t Light Up After Cutting?
If your LED light doesn’t light up after cutting, there are several steps you can take to troubleshoot and potentially fix the issue. First, I recommend checking if the strip was cut at the correct cutting points. These are usually marked on the strip and are the safe spots to cut without damaging the circuitry.
Next, make sure the connector is properly aligned and secured. A loose or misaligned connector can prevent the electrical current from flowing correctly, which would stop the lights from working. It’s also important to inspect for any damage to the strip or connector. Sometimes, the act of cutting or handling can cause small but critical damage.
If everything looks good so far, try adjusting the connection point between the connector and the light strip. A slight adjustment might make all the difference in establishing a good connection.
Finally, if the issue persists despite all these steps, I recommend seeking professional advice. It might also be necessary to consider replacing the damaged section or contacting the manufacturer for further assistance. They can offer specific advice or replacements if needed.